Nail Pattern For Architectural Shingles
Nail Pattern For Architectural Shingles - Updated sep 15, 2021 reviewed by. These shingles are for application to roof decks consisting of plywood, oriented strand board (osb) or sheathing boards capable of receiving and retaining fasteners, and to inclines of not less than 2 per foot. In most cases, 4 nails are adequate. Always adjust nail guns appropriately to avoid improper fastener installation. Of the underlying shingle (as a secondary fastener). Web here’s the best way to install roof shingles, where to nail shingles, how much to overhang the drip edge, and fit the felt paper. This ensures they stay in place and don’t risk being exposed, which can cause corrosion and leaks. Nail each shingle with four nails, positioning them just below the adhesive strip and near the edge. We’ll cover each crucial aspect of the job. That's why gaf's timberline ® shingles with layerlock™ technology * were designed with the strikezone™ nailing area, the industry's largest nail zone. Web how many nails per shingle? Use a consistent nailing pattern across the roofing material to ensure uniformity and structural integrity. Web nailing pattern for architectural shingles. Learn about selecting the correct type of shingles, nailing techniques, overlapping and aligning rows, and completing the installation with finesse. Refer to the gaf pro field guide for additional tips. Web when embarking on a roofing project, selecting the right type of nails is crucial. Of the underlying shingle (as a secondary fastener). Web strike nails at a 90 degree angle from the roof when hammering by hand. Install the recommended number of nails per shingle. Offset the joints of adjacent shingles in a staggered pattern to provide better protection against leaks. How to install architectural shingles. Nail each shingle with four nails, positioning them just below the adhesive strip and near the edge. Measure the layout and purchase shingles. Of the underlying shingle (as a secondary fastener). The metal a nail is made from can make all the difference not only in how well it holds down a shingle, but also. Updated sep 15, 2021 reviewed by. Coil roofing nails for nail guns. Always adjust nail guns appropriately to avoid improper fastener installation. Web here’s the best way to install roof shingles, where to nail shingles, how much to overhang the drip edge, and fit the felt paper. For these shingles, roofers typically use six nails per shingle. This ensures they stay in place and don’t risk being exposed, which can cause corrosion and leaks. Roofing nails are specifically designed for attaching shingles to roof decks, and choosing the correct type can significantly impact the durability and longevity of your roof. Install the recommended number of nails per shingle. Web most shingles require either a 4 or 6. Web building materials & supplies. This chapter will demonstrate how to properly nail roofing shingles. Measure the layout and purchase shingles. Use a consistent nailing pattern across the roofing material to ensure uniformity and structural integrity. Web strike nails at a 90 degree angle from the roof when hammering by hand. We’ll cover each crucial aspect of the job. Refer to the gaf pro field guide for additional tips. For these shingles, roofers typically use six nails per shingle. Learn about selecting the correct type of shingles, nailing techniques, overlapping and aligning rows, and completing the installation with finesse. Of the underlying shingle (as a secondary fastener). These shingles are for application to roof decks consisting of plywood, oriented strand board (osb) or sheathing boards capable of receiving and retaining fasteners, and to inclines of not less than 2 per foot. How to install architectural shingles. Refer to the gaf pro field guide for additional tips. Install the recommended number of nails per shingle. Coil roofing nails. Refer to the gaf pro field guide for additional tips. For these shingles, roofers typically use six nails per shingle. Measure the layout and purchase shingles. Web most shingles require either a 4 or 6 nail pattern per shingle to ensure a tight seal. Roofing nails are specifically designed for attaching shingles to roof decks, and choosing the correct type. Web nailing pattern for architectural shingles. Measure the layout and purchase shingles. When installing thicker shingles, you may need to use a longer nail in order to penetrate the osb beneath fully. Web here’s the best way to install roof shingles, where to nail shingles, how much to overhang the drip edge, and fit the felt paper. That's why gaf's. The metal a nail is made from can make all the difference not only in how well it holds down a shingle, but also how long it lasts over time. Look out for underdriven, overdriven, or angled nails during installation to reduce the risk of installation issues. Install the recommended number of nails per shingle. Measure the layout and purchase. Can i use staples for roofing? Web building materials & supplies. These shingles are for application to roof decks consisting of plywood, oriented strand board (osb) or sheathing boards capable of receiving and retaining fasteners, and to inclines of not less than 2 per foot. This guide provides an extensive overview of roofing nails for shingles, ensuring you. Measure the. Web a large nailing area can make shingles easier and quicker to install while also increasing nail placement accuracy to help secure them better to the roof structure. When installing thicker shingles, you may need to use a longer nail in order to penetrate the osb beneath fully. Most common roofing nail materials. Web building materials & supplies. Refer to the gaf pro field guide for additional tips. Measure the layout and purchase shingles. Web nailing pattern for architectural shingles. Web here’s the best way to install roof shingles, where to nail shingles, how much to overhang the drip edge, and fit the felt paper. Look out for underdriven, overdriven, or angled nails during installation to reduce the risk of installation issues. Use a consistent nailing pattern across the roofing material to ensure uniformity and structural integrity. That's why gaf's timberline ® shingles with layerlock™ technology * were designed with the strikezone™ nailing area, the industry's largest nail zone. This chapter will demonstrate how to properly nail roofing shingles. Roofing nails are specifically designed for attaching shingles to roof decks, and choosing the correct type can significantly impact the durability and longevity of your roof. Offset the joints of adjacent shingles in a staggered pattern to provide better protection against leaks. Place nails at the designated spacing specified by the shingle manufacturer, typically around 6 to 8 inches apart horizontally and 1 to 2 inches from the edges of the shingle. We’ll cover each crucial aspect of the job.
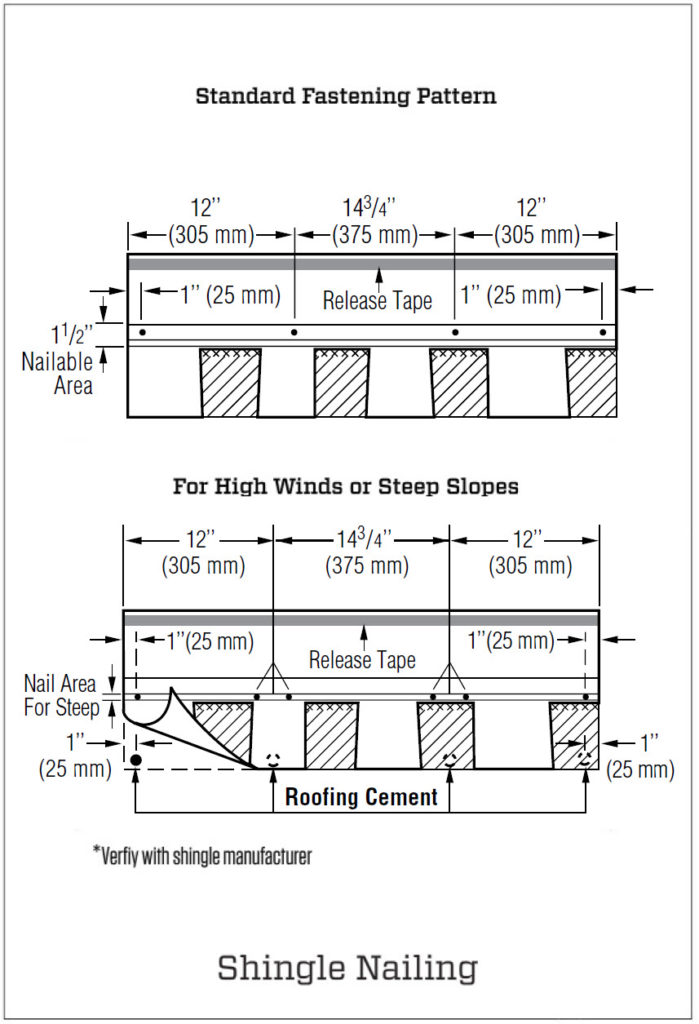
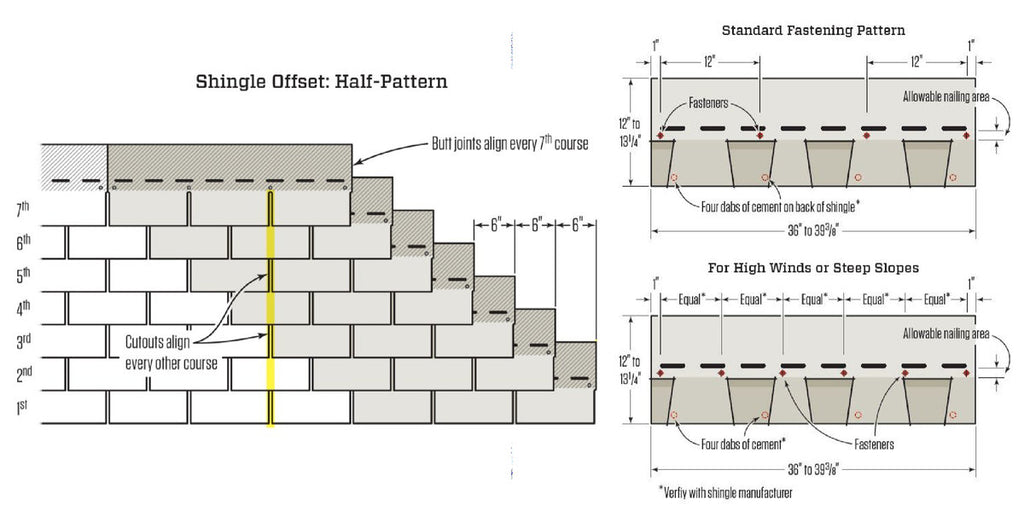
The standard nailing for asphalt shingles is a fournail pattern, with

Proper Nailing Pattern For Architectural Shingles Nail Ftempo

Roof Shingle LayOut and Nailing Patterns GutterBrush
Where To Nail Shingles Architectural Nail Ftempo
Shingle Nailing Pattern McToolman

Nailing Pattern For Architectural Shingles Nail Ftempo

Nailing Pattern For Architectural Shingles Nail Ftempo

How to Shingle a Shed With 3 Tab and Architectural Shingles

Nailing Pattern For Architectural Shingles Nail Ftempo
Roof Shingle LayOut and Nailing Patterns GutterBrush
Typically, Use Four Nails Per Shingle, Placing Them About 1 Inch Above The Cutouts And 6 Inches From The Ends.
Web When Embarking On A Roofing Project, Selecting The Right Type Of Nails Is Crucial.
How Many Nails Per Roofing Square?
Updated Sep 15, 2021 Reviewed By.
Related Post: