Nailing Pattern For Architectural Shingles
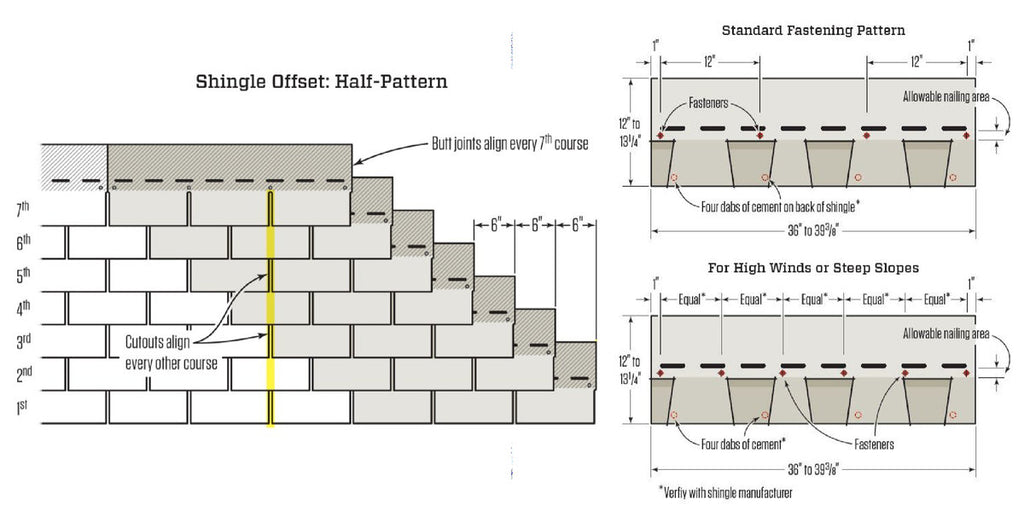
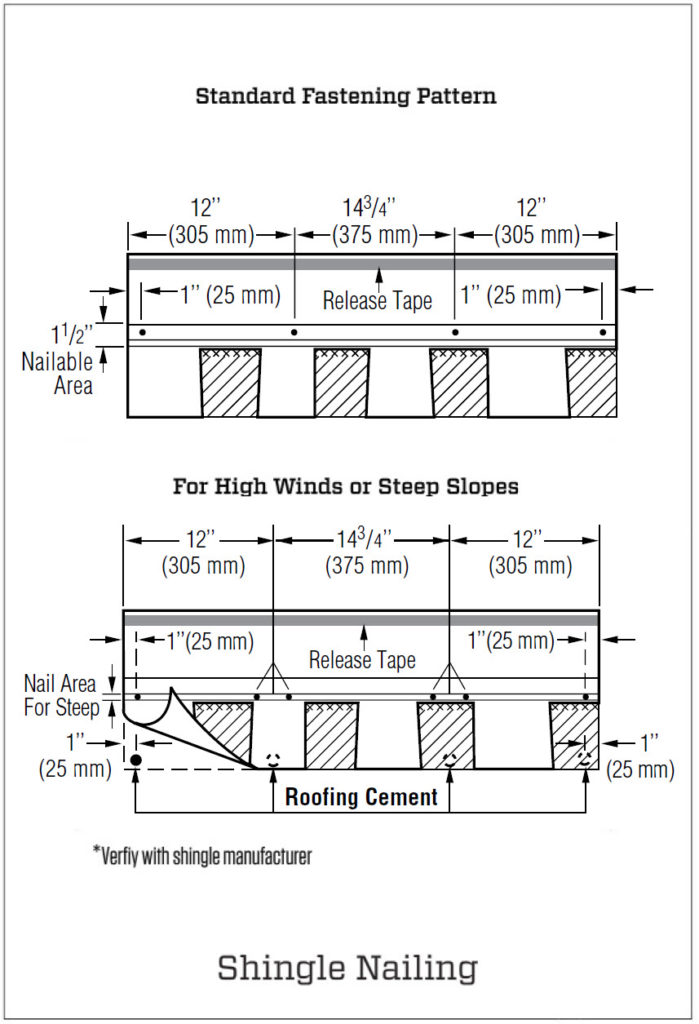
Nailing Pattern For Architectural Shingles - Shingle nails 1 ¼ inch in length and with a smooth, galvanized finish are the most commonly used type of nails for fastening shingles securely to roofs. Plus, homeowners who want to do this diy method should keep the following tips in mind to avoid mistakes: Web when embarking on a roofing project, selecting the right type of nails is crucial. Learn about selecting the correct type of shingles, nailing techniques, overlapping and aligning rows, and completing the installation with finesse. Over time, minutes saved add a powerful cost benefit to your roofing company. Web the most important step is to use the proper equipment and align them no closer than 1” from the edge of the shingle. The correct placement to nail shingles is usually indicated by. When installing thicker shingles, you may need to use a longer nail. Fasteners must be driven flush with the surface of the shingle. Place nails at the designated spacing specified by the shingle manufacturer, typically around 6 to 8 inches apart horizontally and 1 to 2 inches from the edges of the shingle. This ensures they stay in place and don’t risk being exposed, which can cause corrosion and leaks. These shingles are designed for new or reroofing work over any properly built and supported wood roof deck having adequate nail holding capacity and a smooth surface. This chapter will demonstrate how to properly nail roofing shingles. The correct placement to nail shingles is usually indicated by. Web when embarking on a roofing project, selecting the right type of nails is crucial. Learn about selecting the correct type of shingles, nailing techniques, overlapping and aligning rows, and completing the installation with finesse. When installing thicker shingles, you may need to use a longer nail. This guide provides an extensive overview of roofing nails for shingles, ensuring you. Use galvanized (zinc coated) roofing nails, 11 or 12 gauge, with at least 3/8 diameter heads, long enough to penetrate through plywood or 3/4 into boards. Nail heads should be flush with the top of the shingle. To ensure optimal performance of your asphalt roofing shingles, be sure to follow these general directions for proper nailing: Web a large nailing area can make shingles easier and quicker to install while also increasing nail placement accuracy to help secure them better to the roof structure. Web general guidelines for nailing shingles. Nail each shingle with four nails, positioning. When installing thicker shingles, you may need to use a longer nail. Use galvanized (zinc coated) roofing nails, 11 or 12 gauge, with at least 3/8 diameter heads, long enough to penetrate through plywood or 3/4 into boards. Place nails at the designated spacing specified by the shingle manufacturer, typically around 6 to 8 inches apart horizontally and 1 to. The correct placement to nail shingles is usually indicated by. Web when embarking on a roofing project, selecting the right type of nails is crucial. Learn about selecting the correct type of shingles, nailing techniques, overlapping and aligning rows, and completing the installation with finesse. Nail heads should be flush with the top of the shingle. Shingle nails 1 ¼. Over time, minutes saved add a powerful cost benefit to your roofing company. Architectural shingles, being thicker and heavier, require a bit more fastening. For these shingles, roofers typically use six nails per shingle. This ensures they stay in place and don’t risk being exposed, which can cause corrosion and leaks. When installing thicker shingles, you may need to use. Use galvanized (zinc coated) roofing nails, 11 or 12 gauge, with at least 3/8 diameter heads, long enough to penetrate through plywood or 3/4 into boards. When installing thicker shingles, you may need to use a longer nail. Web the most important step is to use the proper equipment and align them no closer than 1” from the edge of. Tap in loose nails with a hammer by hitting the nail heads. The correct placement to nail shingles is usually indicated by. Plus, homeowners who want to do this diy method should keep the following tips in mind to avoid mistakes: Web general guidelines for nailing shingles. Fasteners must be driven flush with the surface of the shingle. For these shingles, roofers typically use six nails per shingle. Use a consistent nailing pattern across the roofing material to ensure uniformity and structural integrity. Web here’s the best way to install roof shingles, where to nail shingles, how much to overhang the drip edge, and fit the felt paper. Web the most important step is to use the proper. Fasteners must be driven flush with the surface of the shingle. Over time, minutes saved add a powerful cost benefit to your roofing company. Place nails at the designated spacing specified by the shingle manufacturer, typically around 6 to 8 inches apart horizontally and 1 to 2 inches from the edges of the shingle. Web general guidelines for nailing shingles.. Web a large nailing area can make shingles easier and quicker to install while also increasing nail placement accuracy to help secure them better to the roof structure. We’ll cover each crucial aspect of the job. Fasteners must be driven flush with the surface of the shingle. Over time, minutes saved add a powerful cost benefit to your roofing company.. Web most shingles require either a 4 or 6 nail pattern per shingle to ensure a tight seal. Web nailing pattern for architectural shingles. Nail each shingle with four nails, positioning them just below the adhesive strip and near the edge. Roofing nails are specifically designed for attaching shingles to roof decks, and choosing the correct type can significantly impact. Place nails at the designated spacing specified by the shingle manufacturer, typically around 6 to 8 inches apart horizontally and 1 to 2 inches from the edges of the shingle. Web when embarking on a roofing project, selecting the right type of nails is crucial. We’ll cover each crucial aspect of the job. This ensures they stay in place and don’t risk being exposed, which can cause corrosion and leaks. These shingles are designed for new or reroofing work over any properly built and supported wood roof deck having adequate nail holding capacity and a smooth surface. Learn about selecting the correct type of shingles, nailing techniques, overlapping and aligning rows, and completing the installation with finesse. The correct placement to nail shingles is usually indicated by. Nail each shingle with four nails, positioning them just below the adhesive strip and near the edge. Offset the joints of adjacent shingles in a staggered pattern to provide better protection against leaks. Tap in loose nails with a hammer by hitting the nail heads. Web a large nailing area can make shingles easier and quicker to install while also increasing nail placement accuracy to help secure them better to the roof structure. Use galvanized (zinc coated) roofing nails, 11 or 12 gauge, with at least 3/8 diameter heads, long enough to penetrate through plywood or 3/4 into boards. Plus, homeowners who want to do this diy method should keep the following tips in mind to avoid mistakes: Be long enough to penetrate at least 3/4 (19 mm) into wood de. To ensure optimal performance of your asphalt roofing shingles, be sure to follow these general directions for proper nailing: Shingle nails 1 ¼ inch in length and with a smooth, galvanized finish are the most commonly used type of nails for fastening shingles securely to roofs.
Architectural Shingle Nailing Pattern The Architect

Proper Nailing Pattern For Architectural Shingles Nail Ftempo

The standard nailing for asphalt shingles is a fournail pattern, with

Nailing Pattern For Architectural Shingles Nail Ftempo

Nailing Pattern For Architectural Shingles Nail Ftempo

Nailing Pattern For Architectural Shingles Nail Ftempo

Roof Shingle LayOut and Nailing Patterns GutterBrush
Roof Shingle LayOut and Nailing Patterns GutterBrush

How to Shingle a Shed With 3 Tab and Architectural Shingles
Where To Nail Shingles Architectural Nail Ftempo
For These Shingles, Roofers Typically Use Six Nails Per Shingle.
Use A Consistent Nailing Pattern Across The Roofing Material To Ensure Uniformity And Structural Integrity.
This Guide Provides An Extensive Overview Of Roofing Nails For Shingles, Ensuring You.
Nail Heads Should Be Flush With The Top Of The Shingle.
Related Post: